
Reese’s Pieces Peanut Butter Brownies (Cookliva Style)
Introduction — a quiet kitchen, a warm pan, and a lot of smiles
Hi, I’m Helen Whitaker — welcome to Cookliva.
Some afternoons call for calm more than anything else. On days like that, I reach for a recipe that lets the oven do the heavy lifting while the kitchen fills with something comforting and familiar. These Reese’s Pieces peanut butter brownies were born on one of those afternoons, when my husband Mark had just come home from work and the kids, Emily and Jack, were circling the counter asking if dessert was “almost ready yet.”
I wanted brownies — real brownies — the kind that sink slightly in the middle, slice clean when they cool, and feel indulgent without being fussy. Peanut butter was non-negotiable (Jack’s request), and Reese’s Pieces were the obvious choice for color, crunch, and that nostalgic candy-shop sweetness. What came out of the oven that day has become a repeat bake in our house, especially when we need something simple that brings everyone to the table.
Why You’ll Love This Recipe
- Deeply fudgy texture without complicated steps or specialty ingredients
- Balanced sweetness — rich chocolate meets creamy peanut butter without either overpowering the other
- Beginner-friendly instructions with visual cues so you know exactly when things are ready
- Family-approved — Mark likes the richness, Emily loves the candy crunch, and Jack always asks for the corner pieces
- Make-ahead friendly brownies that actually taste better the next day

These brownies feel special, but they fit easily into everyday life — exactly how I like to cook.
The Origin of This Recipe
This recipe started as a simple chocolate brownie experiment. I’ve baked plenty of brownies over the years, but I wanted one that leaned into peanut butter without turning into a dense, dry bar. The key was layering flavors rather than mixing everything together at once.
By swirling peanut butter gently into the batter and folding Reese’s Pieces in at the very end, you get distinct pockets of flavor and texture. That swirl creates contrast — fudgy chocolate in one bite, creamy peanut butter in the next. It’s the same approach my grandmother used when she taught me marble cakes as a child: less mixing, more intention.
Ingredients — and Why Each One Matters
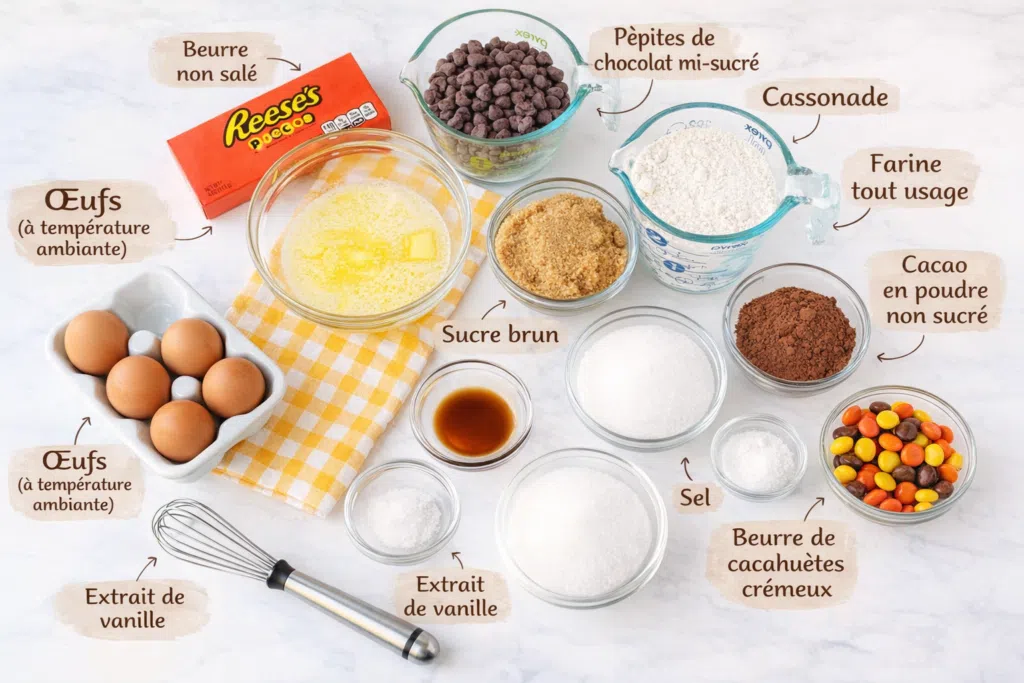
- Unsalted butter – Adds richness and helps create that glossy, fudgy crumb
- Semi-sweet chocolate chips – Melt smoothly and balance the sweetness of the candy
- Granulated sugar – Provides structure and that classic brownie chew
- Brown sugar – Adds moisture and subtle caramel depth
- Eggs (room temperature) – Essential for structure and a smooth batter
- Vanilla extract – Rounds out the chocolate flavor
- All-purpose flour – Just enough to hold everything together without turning cakey
- Unsweetened cocoa powder – Intensifies chocolate flavor without extra sugar
- Salt – Absolutely necessary to balance sweetness
- Creamy peanut butter – Creates ribbons of richness throughout the brownies
- Reese’s Pieces – Adds crunch, color, and bursts of peanut butter candy flavor
Every ingredient plays a role here. Brownies are simple, but small details matter.
Instructions — Slow, Steady, and Foolproof
- Prepare the pan and oven
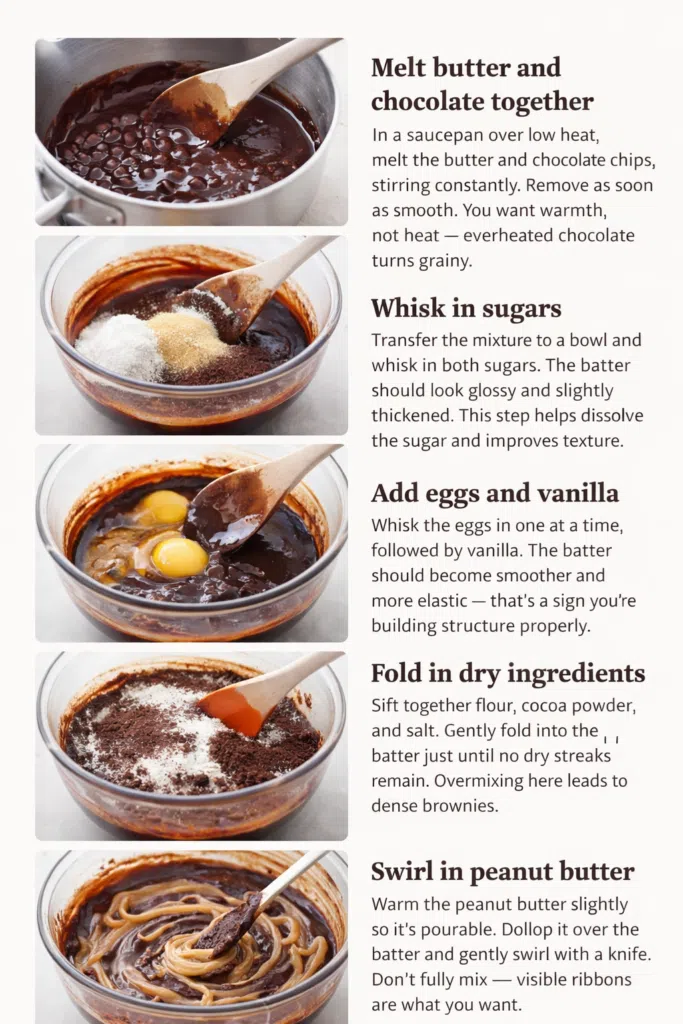
Preheat your oven to 350°F (175°C). Line an 8×8-inch baking pan with parchment paper, leaving a little overhang. This makes lifting the brownies out effortless later. - Melt butter and chocolate together
In a saucepan over low heat, melt the butter and chocolate chips, stirring constantly. Remove as soon as smooth. You want warmth, not heat — overheated chocolate turns grainy. - Whisk in sugars
Transfer the mixture to a bowl and whisk in both sugars. The batter should look glossy and slightly thickened. This step helps dissolve the sugar and improves texture. - Add eggs and vanilla
Whisk the eggs in one at a time, followed by vanilla. The batter should become smoother and more elastic — that’s a sign you’re building structure properly. - Fold in dry ingredients
Sift together flour, cocoa powder, and salt. Gently fold into the batter just until no dry streaks remain. Overmixing here leads to dense brownies. - Swirl in peanut butter
Warm the peanut butter slightly so it’s pourable. Dollop it over the batter and gently swirl with a knife. Don’t fully mix — visible ribbons are what you want.
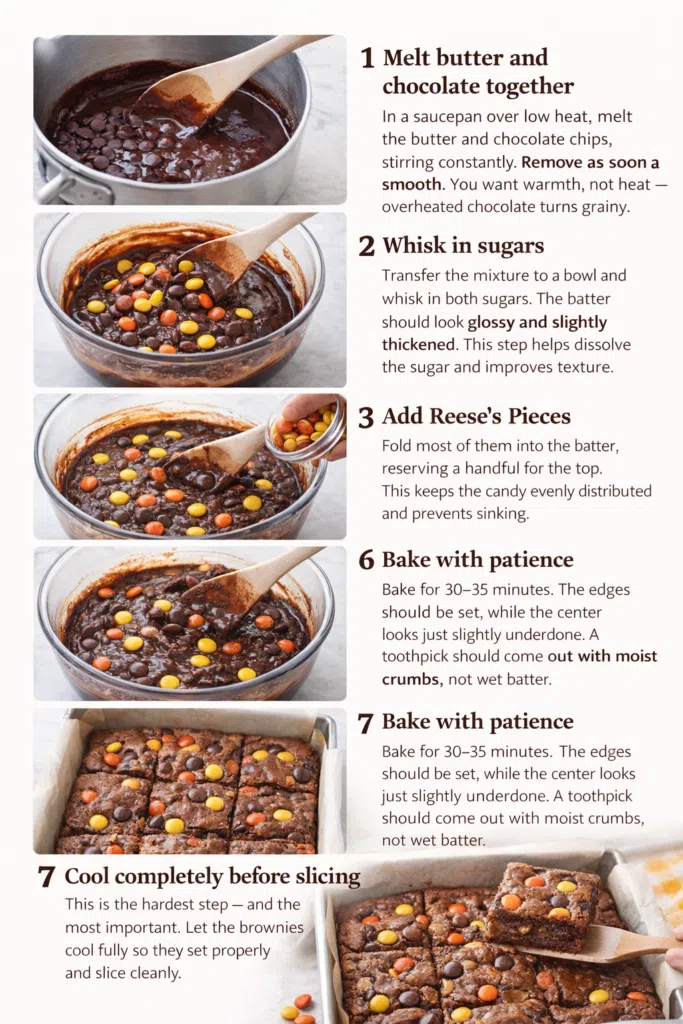
- Add Reese’s Pieces
Fold most of them into the batter, reserving a handful for the top. This keeps the candy evenly distributed and prevents sinking. - Bake with patience
Bake for 30–35 minutes. The edges should be set, while the center looks just slightly underdone. A toothpick should come out with moist crumbs, not wet batter. - Cool completely before slicing
This is the hardest step — and the most important. Let the brownies cool fully so they set properly and slice cleanly.
Tips & Flavor Variations
- Warm the peanut butter slightly so it swirls smoothly without tearing the batter.
- Use parchment over foil for cleaner edges and easier removal.
- Chill before slicing if you want bakery-style squares. Cold brownies cut beautifully.
- Try chunky peanut butter for extra texture if your family likes crunch.
- Seasonal twist: Add a pinch of cinnamon in fall or a sprinkle of flaky salt on top for contrast.
- Dietary option: Use gluten-free 1:1 flour — these brownies are forgiving and adapt well.
Common Myths & Mistakes
Myth 1: Brownies should be baked until the center is completely firm
Many people believe brownies aren’t done unless the center is fully set and a toothpick comes out clean. This belief comes from cake baking logic and fear of underbaking.
People believe this because underbaked desserts are often associated with food safety issues. Social media also encourages “perfectly clean toothpick” results without explaining context.
This is incorrect because brownies continue cooking as they cool. Baking until fully firm drives out moisture, resulting in dry, crumbly bars.
The correct approach is to remove brownies when the center still looks slightly soft. Moist crumbs on a toothpick mean fudgy success, not failure.
Myth 2: More peanut butter means better flavor
It’s tempting to think adding extra peanut butter will improve these brownies. After all, peanut butter is delicious.
This belief comes from loving the ingredient and assuming more equals better. Unfortunately, peanut butter contains fat that can overwhelm structure.
Too much peanut butter weighs down the batter and prevents proper setting, leaving greasy or dense brownies.
The correct approach is controlled swirling. Use measured amounts and let contrast create flavor instead of excess.
Myth 3: Candy always melts into brownies evenly
Many expect Reese’s Pieces to melt like chocolate chips. They don’t — and that’s intentional.
This myth comes from misunderstanding candy coatings. Reese’s Pieces have a shell designed to hold shape.
If mixed improperly, they sink or concentrate in one area.
The correct approach is folding most into the batter and sprinkling some on top. This ensures even distribution and visual appeal.
FAQ – Frequently Asked Questions
How should I store Reese’s Pieces peanut butter brownies to keep them fresh?
Store these brownies in an airtight container at room temperature for up to three days. If your kitchen is warm, refrigeration helps preserve texture. Always let brownies cool fully before storing to prevent condensation, which leads to soggy edges.
Can I freeze these brownies for later?
Yes, and they freeze beautifully. Wrap individual slices tightly and store in a freezer-safe container for up to two months. Thaw at room temperature or microwave briefly for a warm treat.
Why did my brownies turn out dry?
Dry brownies are usually overbaked. Even a few extra minutes can remove essential moisture. Check early and remember carryover cooking continues after removal.
Can I substitute natural peanut butter?
Natural peanut butter works, but it should be well-stirred and slightly thick. Very runny natural peanut butter can separate and affect texture.
How do I get clean slices without cracking?
Chill brownies for 30 minutes, then slice with a sharp knife wiped clean between cuts. This creates smooth edges every time.
Final Thoughts
These Reese’s Pieces peanut butter brownies are the kind of dessert that doesn’t rush you. They ask for a little patience, reward you with rich flavor, and bring everyone into the kitchen while they cool. In our house, they rarely last more than a day — and honestly, that feels like success.
Print
Reese’s Pieces Peanut Butter Brownies
- Total Time: 50 minutes
- Diet: Vegetarian
Description
Fudgy chocolate brownies swirled with creamy peanut butter and loaded with colorful Reese’s Pieces for the perfect balance of rich and sweet.
Ingredients
-
Unsalted butter
-
Semi-sweet chocolate chips
-
Granulated sugar
-
Brown sugar
-
Eggs
-
Vanilla extract
-
All-purpose flour
-
Unsweetened cocoa powder
-
Salt
-
Creamy peanut butter
-
Reese’s Pieces
Instructions
-
Preheat oven to 350°F and line an 8×8 pan with parchment.
-
Melt butter and chocolate together until smooth.
-
Whisk in sugars, then eggs and vanilla.
-
Fold in dry ingredients gently.
-
Swirl in peanut butter and fold in Reese’s Pieces.
-
Bake 30–35 minutes until edges are set and center is slightly soft.
-
Cool completely before slicing.
Notes
Store in an airtight container up to 3 days or freeze individual slices for later.
Let brownies cool fully for best texture.
- Prep Time: 15 minutes
- Cook Time: 35 minutes
- Category: Dessert
- Method: Baking
- Cuisine: American
Nutrition
- Serving Size: 9 brownies
- Calories: 420 per serving
- Sugar: 38g
- Fat: 22 g


