Perfect Pan-Seared Chicken Breast (Juicy, Golden & Foolproof)
Hi, I’m Helen Whitaker — welcome to Cookliva.
Chicken breast has always been one of those ingredients I wanted to love more than I actually did. For years, it felt unpredictable — sometimes juicy, sometimes dry, and often disappointing after a long day when dinner really needed to work.
I remember one particular evening when Mark had just come home late from work, Emma was cranky, Luke was hungry yesterday, and I stood at the stove staring at two chicken breasts wondering how such a simple ingredient could feel so stressful. That night, I slowed down instead of speeding up. I paid attention to heat, thickness, and timing — and something clicked.
The chicken turned out golden on the outside, tender inside, and honestly… better than most restaurant versions I’d had. Mark asked what I did differently. Emma cleaned her plate. Luke asked if we could have it again tomorrow.
This recipe is the result of many nights like that — learning that chicken breast doesn’t need tricks or heavy sauces. It just needs calm, respectful cooking.
Why You’ll Love This Recipe
If you’ve ever cut into chicken breast and sighed because it was dry, this recipe is for you. This method creates reliable juiciness every single time by focusing on even thickness and gentle heat control.
You’ll also love how simple it is. No marinades, no complicated spice blends, and no oven juggling. Everything happens in one pan, with ingredients you already have.
This chicken works everywhere — sliced over salads, tucked into sandwiches, served with potatoes, or eaten straight from the pan (I won’t tell). It’s naturally gluten-free, high in protein, and easy to adjust for different flavors.
Most importantly, it builds confidence. Once you master this, chicken breast stops feeling intimidating and starts feeling dependable.
The Origin of This Recipe
Growing up, chicken breast was usually baked until “definitely done,” which often meant overdone. That fear of undercooking stuck with me for years. When I started cooking for my own family, I realized how many people struggle with the same thing.
This recipe came from unlearning that fear. Through repetition, I learned that chicken breast cooks best when treated gently and removed from heat earlier than instinct tells you. Residual heat finishes the job — and resting does the rest.
It’s a technique-based recipe, not a trend-based one. And once you understand why it works, you can apply it to countless meals.
Ingredients
Each ingredient here has a purpose — nothing extra, nothing missing.
- Boneless, skinless chicken breasts – Medium-sized breasts work best. Very large ones should be cut in half horizontally.
- Olive oil – Helps conduct heat evenly and prevents sticking.
- Salt – Enhances flavor and helps the chicken retain moisture.
- Black pepper – Adds balance and subtle warmth.
- Garlic powder – Provides savory depth without burning.
- Butter (optional) – Adds richness and helps with final browning.

Instructions
- Prepare the chicken.
Pat the chicken breasts dry with paper towels. Moisture on the surface prevents browning. If the breasts are uneven, slice or gently pound them to even thickness — this is critical for even cooking. - Season generously.
Sprinkle both sides with salt, pepper, and garlic powder. Seasoning right before cooking ensures good surface flavor without drawing out moisture too early. - Heat the pan properly.
Place a heavy skillet over medium heat and add olive oil. The oil should shimmer but not smoke. This temperature allows browning without burning. - Sear the chicken.
Place the chicken in the pan smooth-side down. Let it cook undisturbed for 5–6 minutes. Resist the urge to move it — this creates that golden crust. - Flip and finish gently.
Flip the chicken, lower the heat slightly, and cook another 4–6 minutes. If using butter, add it now and spoon it over the chicken for extra flavor. - Check doneness and rest.
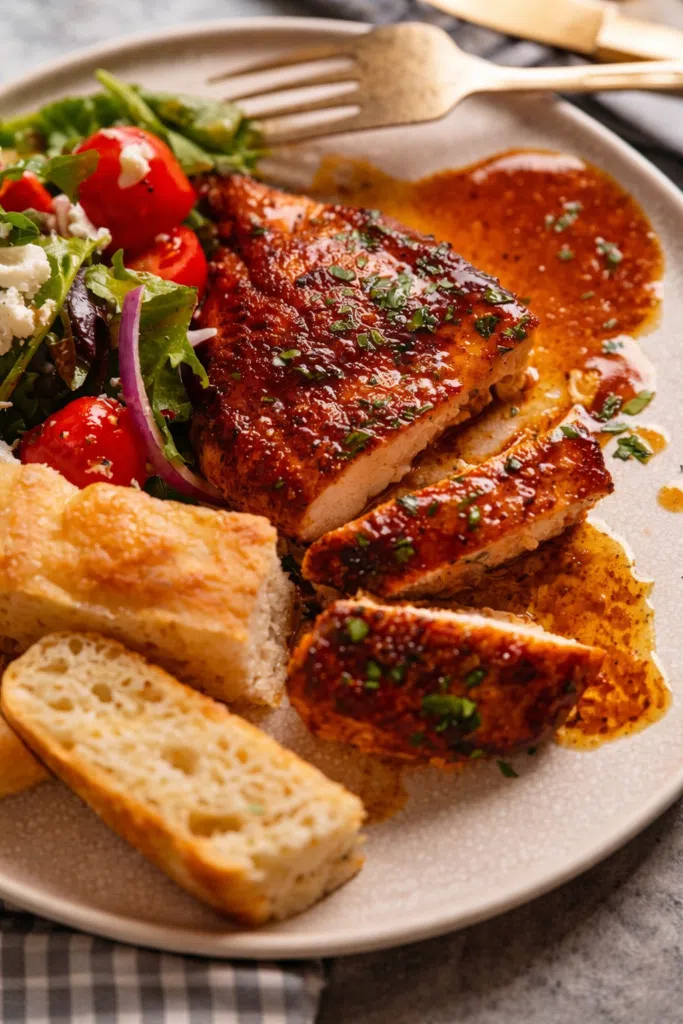
Remove the chicken when the internal temperature reaches 160–162°F. Let it rest for 5 minutes — it will finish cooking to 165°F naturally.
Slice against the grain and serve warm.
Tips & Flavor Variations
- Even thickness matters more than time.
Chicken cooks from the outside in. Uneven thickness guarantees uneven results. - Medium heat beats high heat.
High heat browns quickly but dries out the interior. Controlled heat gives you both color and juiciness. - Resting is non-negotiable.
Cutting too soon releases juices and dries out the meat. - Lemon-herb variation:
Finish with lemon juice and fresh thyme for brightness. - Honey-garlic version:
Add a drizzle of honey and minced garlic in the final minute for a lightly sticky glaze. - Spice-forward option:
Add smoked paprika, cumin, or chili powder for warmth.
Common Myths & Mistakes
Myth 1: Chicken breast must be cooked until completely firm to be safe
Many people believe chicken must be cooked until it feels hard and stiff, fearing undercooking. This belief comes from outdated food safety advice and visual cues that prioritize caution over quality. In reality, chicken breast becomes dry and tough when cooked beyond its ideal temperature. The correct approach is understanding carryover cooking. Removing chicken from heat slightly early and allowing it to rest ensures safety and tenderness. Firm-but-springy is the goal — not rigid.
Myth 2: You should constantly flip chicken to prevent burning
This habit comes from anxiety at the stove. People flip repeatedly because they worry the chicken will stick or scorch. In reality, frequent flipping prevents browning and leads to pale, uneven chicken. Proper heat and patience allow the chicken to release naturally from the pan once a crust forms. One flip is enough.
Myth 3: Chicken breast needs heavy sauces to be enjoyable
This myth exists because dry chicken does need sauce to be palatable. But when cooked correctly, chicken breast has a clean, mild flavor that doesn’t require covering up. Simple seasoning and proper technique allow the natural taste and texture to shine. Sauces become optional instead of necessary.
FAQ – Frequently Asked Questions
How long does cooked chicken breast last in the fridge?
Properly stored chicken breast lasts up to four days in the refrigerator. Let it cool completely before storing in an airtight container. Slicing before storing makes reheating easier and more even.
Can I freeze pan-seared chicken breast?
Yes. Allow the chicken to cool fully, then wrap tightly and freeze for up to three months. Thaw overnight in the fridge before reheating gently.
Why did my chicken breast turn out dry?
Dry chicken is almost always the result of overcooking or uneven thickness. Use a thermometer and remove the chicken early, allowing it to rest.
Can I use frozen chicken breast?
Fresh is best, but if using frozen, thaw completely and pat dry thoroughly before cooking. Excess moisture prevents browning.
How do I reheat chicken breast without drying it out?
Reheat gently over low heat or in a covered pan with a splash of broth. Avoid high heat and long reheating times.
Print
Perfect Pan-Seared Chicken Breast (Juicy, Golden & Foolproof)
- Total Time: 17 minutes
- Diet: Gluten Free
Description
Juicy, golden chicken breast cooked simply in a skillet with foolproof technique.
Ingredients
-
2 boneless, skinless chicken breasts
-
1 tablespoon olive oil
-
¾ teaspoon salt
-
½ teaspoon black pepper
-
½ teaspoon garlic powder
-
1 tablespoon butter (optional)
Instructions
-
Pat chicken dry and ensure even thickness.
-
Season both sides with salt, pepper, and garlic powder.
-
Heat olive oil in a skillet over medium heat.
-
Sear chicken 5–6 minutes without moving.
-
Flip, reduce heat slightly, and cook 4–6 minutes more.
-
Remove at 160–162°F and rest 5 minutes before slicing.
Notes
Resting ensures juiciness. Store leftovers up to 4 days refrigerated or freeze up to 3 months.
- Prep Time: 5 minutes
- Cook Time: 12 minutes
- Category: Dinner
- Method: Stovetop
- Cuisine: American
Nutrition
- Calories: 230 per serving
- Sugar: 0 g
- Fat: 10 g