You’ll Never Make Spring Sugar Cookies Another Way 🌸
Pastel spring flower sugar cookies are one of those simple joys that instantly bring a sense of calm and beauty into the kitchen. Hi, I’m Helen Whitaker, and these cookies have quietly become part of our spring rhythm — the kind of recipe that doesn’t just fill a plate, but fills a moment.
I still remember the first time I made them. It was one of those gentle afternoons where the sunlight lingers a little longer, and everything feels just a bit softer. Oliver was trying to “help” by sneaking pieces of dough, Sophie was carefully choosing which flower shape to use next, and Daniel walked in halfway through and said, “It smells like a bakery in here.”
That’s what I love most about these cookies — they’re not about perfection. Some of our flowers come out a little uneven, some icing lines aren’t quite straight, but somehow that makes them even more special. They feel homemade in the best possible way.
Over time, this recipe has become less about baking something pretty, and more about slowing down together. Rolling the dough, choosing soft pastel colors, sitting around the table decorating without rushing — it’s one of those small traditions that brings us back to what matters.
And the best part? These cookies are wonderfully simple. No complicated techniques, no stress — just soft, buttery sugar cookies with gentle vanilla flavor, topped with light, pastel icing that feels like spring in every bite.
If you’re looking for a recipe that’s easy, comforting, and just a little bit magical to make with your family, this is one I come back to again and again. 🌸

These pastel spring flower sugar cookies are one of my favorite ways to bring soft colors and simple joy into everyday baking.
Quick ANSWER
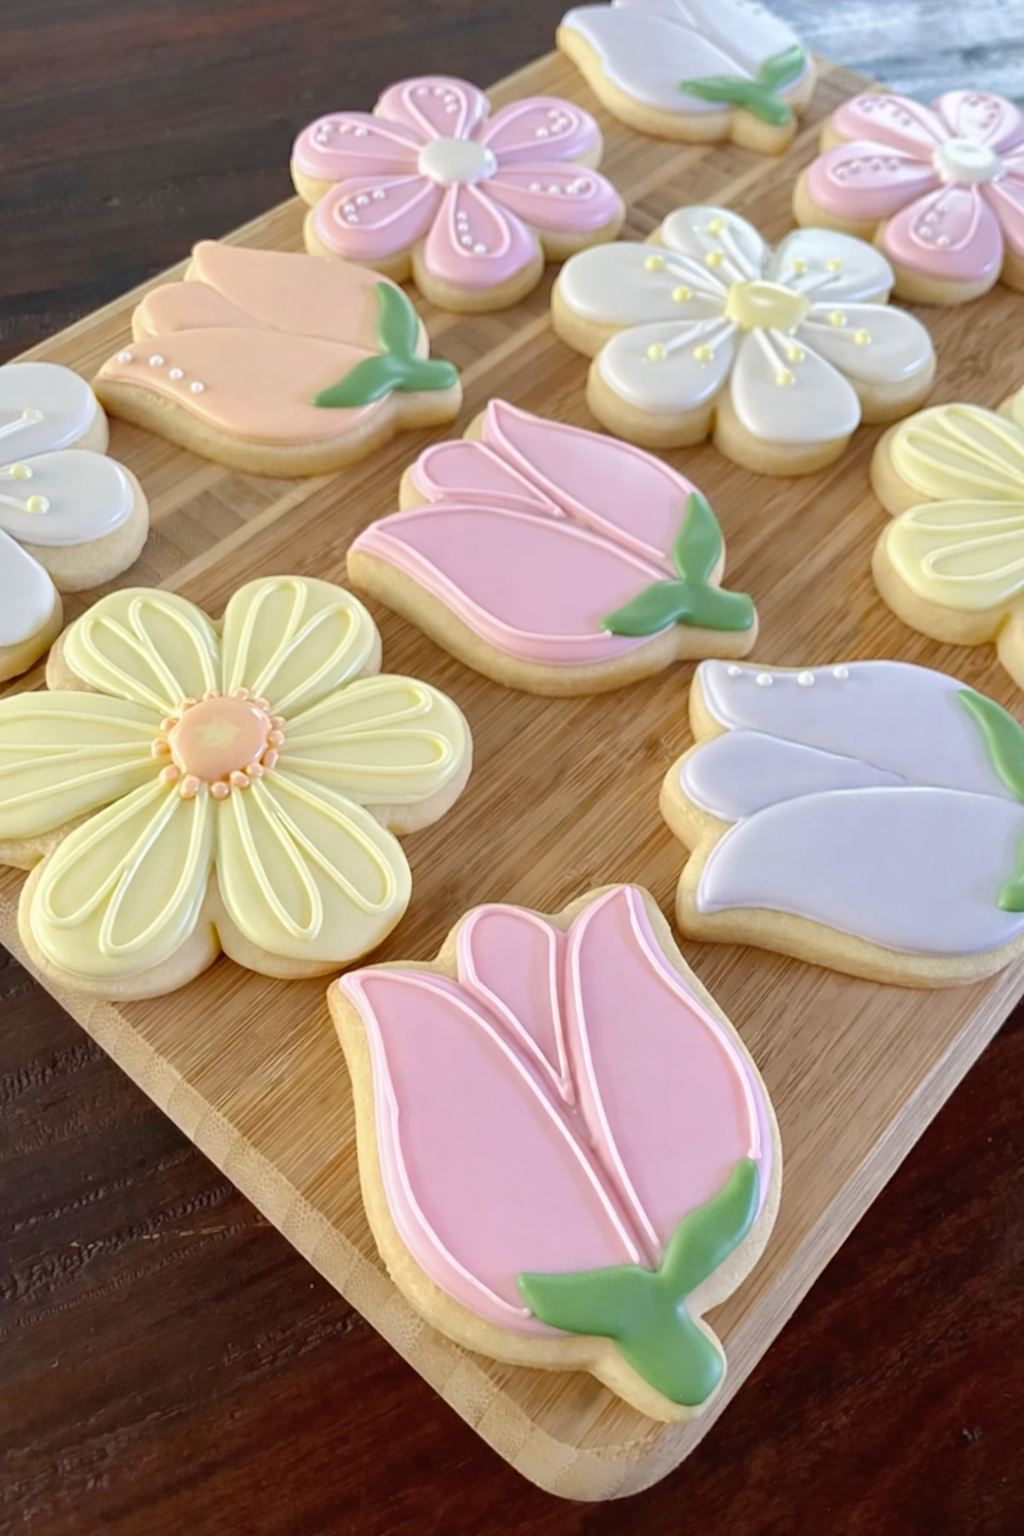
These pastel spring flower cookies are classic soft sugar cookies decorated with simple royal icing in soft spring colors like pink, yellow, lavender, and peach. They’re perfect for Easter, brunches, or simply celebrating the season.
Quick Overview
- Prep Time: 20 minutes
- Chill Time: 1 hour
- Bake Time: 10 minutes
- Difficulty: Beginner-friendly
- Best For: Spring gatherings, Easter, family baking
Why You’ll Love This Recipe
There’s something incredibly calming about making these cookies. The dough is forgiving, the shapes are playful, and the decorating doesn’t require perfection.
You’ll love this recipe because:
- The cookies stay soft and tender, not dry or crumbly
- The icing is simple and beginner-friendly
- It’s a perfect activity with kids (Sophie insists on “just one more cookie” every time)
- The colors and shapes feel like instant spring on a plate
- You can make them ahead without stress
The Origin of This Recipe
This recipe started as my grandmother’s classic sugar cookie — simple, reliable, and always made with care. Over the years, I adapted it slightly to hold its shape better for decorating while still keeping that soft bite.
The pastel decorating idea came much later, inspired by a spring picnic we had one year. I remember thinking how lovely it would be to bring something that matched the season — soft colors, floral shapes, something that felt light and cheerful.
Now, it’s become a yearly tradition.
Ingredients
For the Cookies
- 2 ¾ cups all-purpose flour
- 1 teaspoon baking powder
- ½ teaspoon salt
- 1 cup unsalted butter, softened
- 1 cup granulated sugar
- 1 egg
- 2 teaspoons vanilla extract
For the Royal Icing
- 2 cups powdered sugar
- 1–2 tablespoons milk
- 1 tablespoon light corn syrup
- ½ teaspoon vanilla extract
- Gel food coloring (pink, yellow, lavender, green, peach)
Instructions
Step 1: Make the Dough
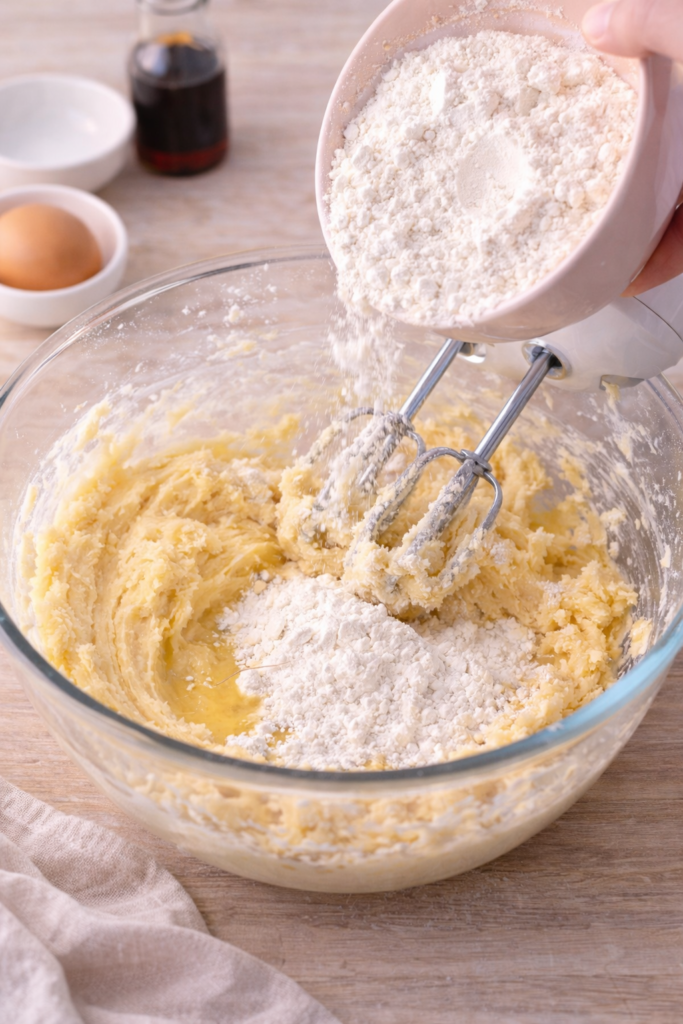
In a medium bowl, whisk together the flour, baking powder, and salt. Set aside.
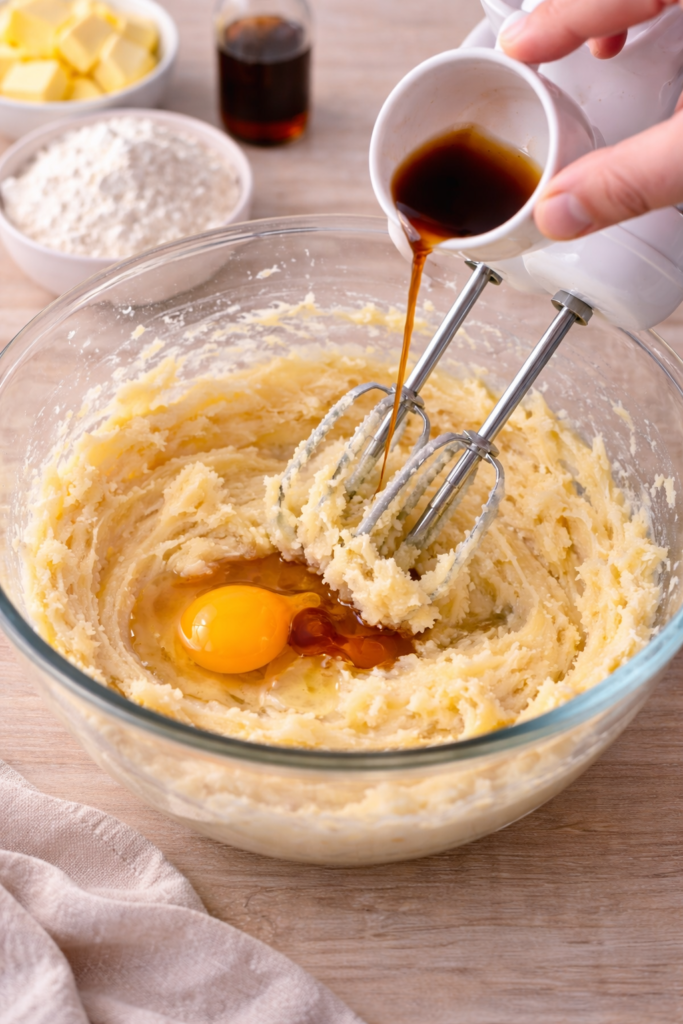
In a separate large bowl, cream the butter and sugar until it looks pale and fluffy — about 2–3 minutes. This step matters more than people think. If it’s too dense, your cookies won’t have that soft texture.
Add the egg and vanilla, mixing until smooth.
Gradually add the dry ingredients. The dough should come together without feeling sticky. If it sticks too much to your hands, add a tablespoon of flour.
Step 2: Chill the Dough
Wrap the dough and refrigerate for at least 1 hour.
This step prevents spreading. Skipping it is one of the most common mistakes — your flowers will lose their shape.
Step 3: Roll and Cut
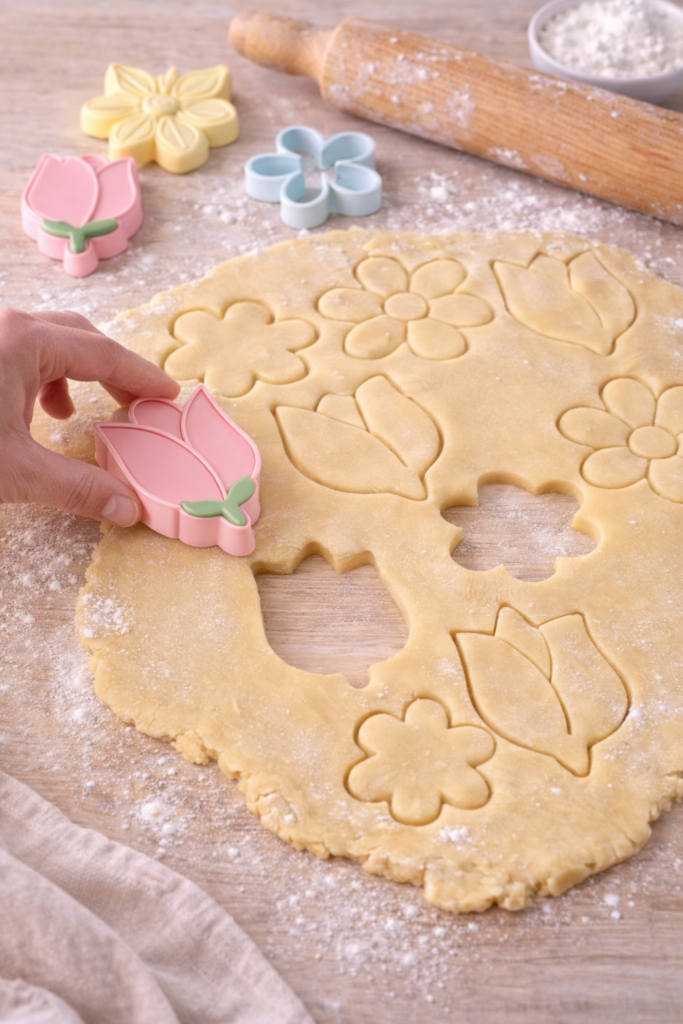
Roll the dough to about ¼ inch thick. Keep it even — uneven dough means uneven baking.
Use flower and tulip cookie cutters to create shapes.
Place them on a lined baking sheet, leaving a little space between each.
Step 4: Bake
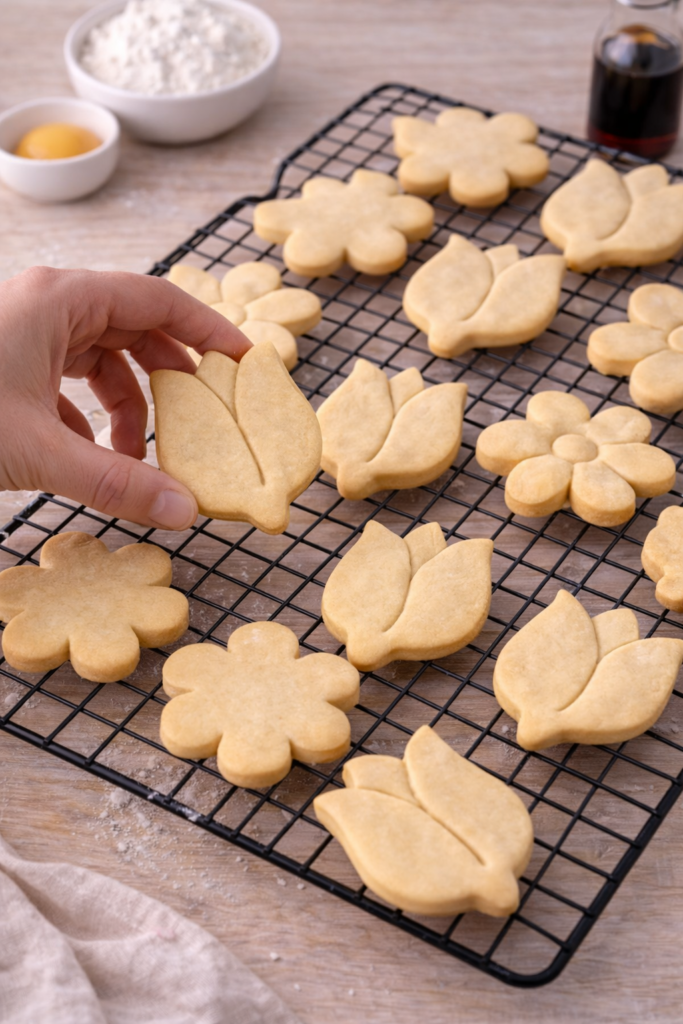
Bake at 350°F (175°C) for 8–10 minutes.
Watch closely — the edges should be just lightly golden, not browned. Overbaking will make them crisp instead of soft.
Let them cool completely before decorating.
Step 5: Make the Icing
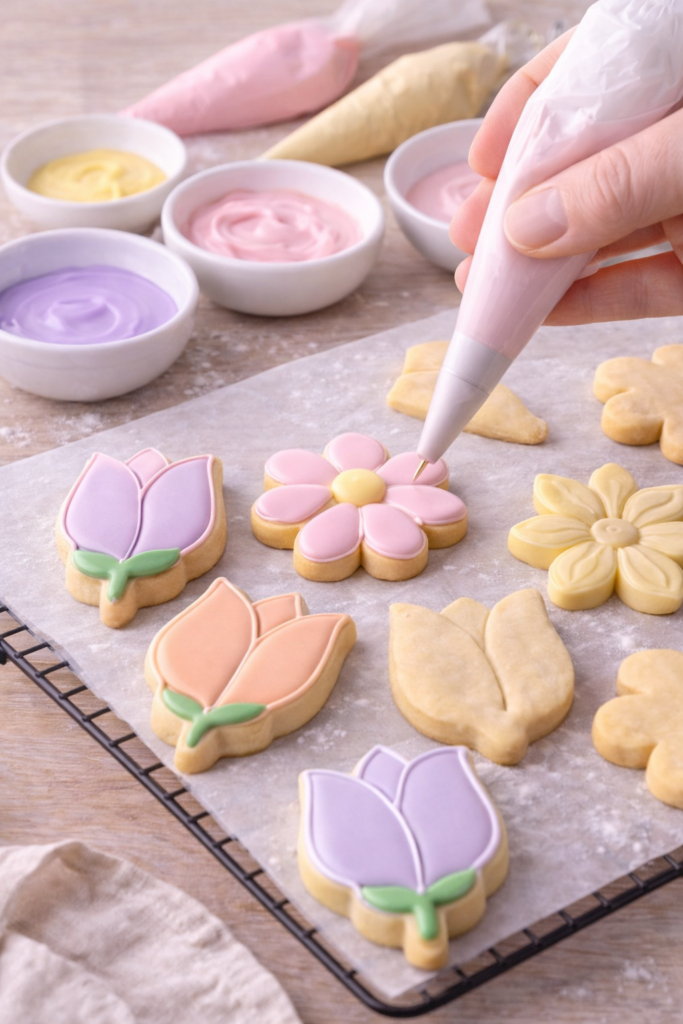
Mix powdered sugar, milk, corn syrup, and vanilla until smooth.
The consistency should be like glue — not too runny, not too thick. If it’s too thin, add sugar. Too thick? Add a tiny bit of milk.
Divide into bowls and add your pastel colors.
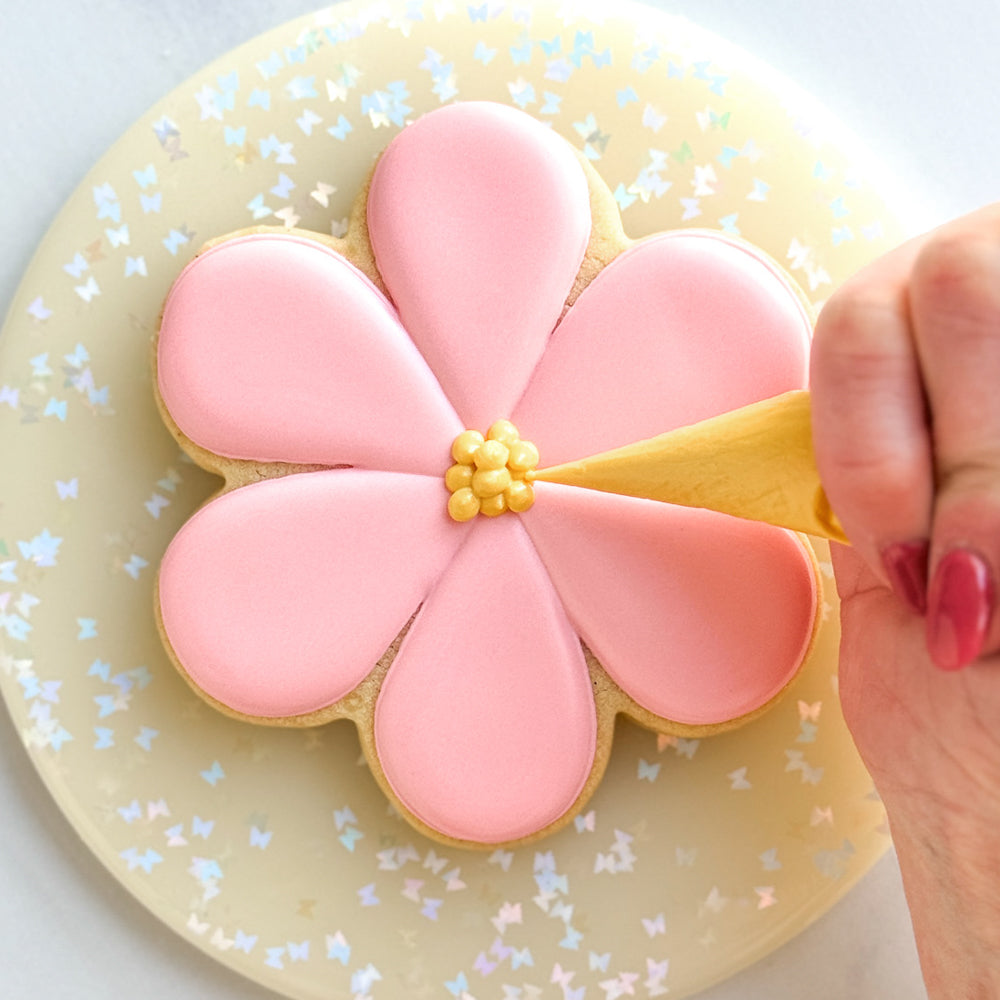
Step 6: Decorate
4
Outline the cookies first, then fill them in.
Use a toothpick to gently spread icing into corners and pop any air bubbles.
Let the cookies sit for at least 2–3 hours to fully set.
Tips & Flavor Variations
- Don’t skip creaming the butter properly
This creates air pockets that give the cookies a soft texture instead of dense. - Use gel food coloring, not liquid
Gel keeps colors vibrant without thinning your icing too much. - Work in batches when decorating
Icing dries faster than you think — especially if your kitchen is warm. - Add almond extract for a bakery-style flavor
Just ¼ teaspoon transforms the cookies into something more elegant. - Try citrus zest (lemon or orange)
This adds brightness and pairs beautifully with spring flavors. - Using gel food coloring helps keep your icing vibrant without affecting consistency. Many professional bakers recommend gel colors over liquid ones for better control and results.
Flavor Variations
- Lemon sugar cookies – add lemon zest + a little juice
- Vanilla almond cookies – half vanilla, half almond extract
- Gluten-free version – use a 1:1 gluten-free flour blend
- Dairy-free option – swap butter with plant-based butter
Serving Ideas
These pastel spring flower sugar cookies are perfect for so many spring moments.
I love serving them on a simple plate during afternoon tea, or bringing them to spring gatherings where they instantly brighten the table. Sophie always picks the pink ones first, while Oliver somehow manages to grab the biggest cookie every time.
They’re especially lovely for:
- Easter brunch
- Baby showers
- Spring picnics
- Family baking days
If you enjoy soft, comforting baked treats like these, you might also love this lemon blueberry cake or these coffee cake muffins for a cozy homemade spread.
Common Mistakes to Avoid
Even though these pastel spring flower sugar cookies are simple to make, a few small mistakes can affect the final result.
- Skipping the chilling step
This is the most common mistake. Without chilling, the cookies will spread and lose their shape. According to baking experts at the King Arthur Baking Company, chilling dough helps control spreading and improves texture.
- Overbaking the cookies
Bake just until the edges are lightly golden. Overbaking makes them dry instead of soft.
- Rolling the dough unevenly
Uneven thickness leads to uneven baking. Try to keep the dough at about ¼ inch thick.
- Using icing that’s too thin or too thick
If the icing is too runny, it won’t hold shape. Too thick, and it won’t spread smoothly.
🌸 A Simple Sweet Treat
These pastel spring flower sugar cookies are meant to be enjoyed as a simple, comforting treat.
They’re not about being perfect or “healthy” — they’re about creating a moment. A quiet afternoon, a little laughter in the kitchen, and something sweet to share at the table.
And honestly, that balance is just as important.
Nutrition Information (Approximate per cookie)
- Calories: 120–150
- Carbohydrates: 18–22g
- Sugar: 10–12g
- Fat: 5–7g
- Protein: 1–2g
These pastel spring flower sugar cookies are a simple sweet treat meant to be enjoyed in moderation as part of a balanced lifestyle.
FAQ – Frequently Asked Questions
How long do decorated sugar cookies last in the fridge?
Decorated sugar cookies can last up to 5–7 days when stored in an airtight container in the fridge. However, I usually recommend keeping them at room temperature unless your kitchen is very warm. Refrigeration can sometimes cause condensation on the icing, which affects the finish. If you do refrigerate them, let them come to room temperature before serving so the texture softens again and the flavors shine through.
Can I freeze these cookies without ruining the icing?
Yes, but with a small adjustment. It’s best to freeze the cookies before decorating for the best results. Once baked and cooled, place them in a freezer-safe container for up to 2 months. When ready, thaw at room temperature and decorate fresh. If you freeze already decorated cookies, the icing can sometimes become slightly sticky or dull due to moisture changes during thawing.
Why did my sugar cookies spread too much?
This usually happens when the dough wasn’t chilled long enough or the butter was too soft. Another common cause is rolling the dough too thin. When the butter melts too quickly in the oven, the cookies lose their structure. To fix this, always chill the dough thoroughly and work quickly when cutting shapes. If needed, pop the cut cookies back into the fridge for 10 minutes before baking.
What can I substitute for corn syrup in the icing?
If you prefer not to use corn syrup, you can substitute it with honey or omit it entirely. The corn syrup helps give the icing a slight shine and smooth finish, but the cookies will still turn out beautifully without it. If skipping it, you may need to adjust the liquid slightly to get the right consistency. The texture will be a bit more matte, but still delicious.
How do I fix icing that is too runny or too thick?
If your icing is too runny, simply add more powdered sugar a tablespoon at a time until it thickens. If it’s too thick, add a few drops of milk and mix gently. The goal is a consistency that flows slowly but holds its shape. Think of it like glue — it should spread easily but not drip uncontrollably. Getting this right makes decorating much easier and more enjoyable.
🌸 Conclusion
These pastel spring flower sugar cookies have become one of those quiet little traditions in my kitchen — simple, comforting, and full of meaning.
They’re not about perfect shapes or flawless icing. They’re about slowing down, sharing a moment, and creating something together. I’ve lost count of how many times Sophie asked for “just one more cookie,” or how Oliver somehow managed to sneak an extra one before they even cooled.
That’s what I love most about recipes like this. They bring a bit of softness into the day — a reminder that even the simplest things can feel special.
If you try these pastel spring flower sugar cookies, take your time with them. Choose your colors, enjoy the process, and make them your own.
Because in the end, it’s not just about the cookies — it’s about the moments you create around them. 🌸
For a full dessert table, I also like adding classic vanilla cupcakes alongside these cookies for a soft and cheerful spring presentation.