
No-Bake Cheesecake Jars (A Calm Dessert for Busy Days)
Hi, I’m Helen Whitaker — welcome to Cookliva.
There are days when I love turning on the oven, taking my time, and letting something bake low and slow. And then there are days when life is loud, homework needs checking, dinner dishes are still in the sink, and dessert needs to happen without heating up the kitchen.
That’s where these no-bake cheesecake jars come in.
The first time I made these, it was a warm weekday evening, and Mark had just finished mowing the lawn while Emma and Noah were sprawled on the living room floor building something out of blocks that definitely did not follow the instructions. I wanted something sweet, comforting, and homemade — but I didn’t want another task that required precision or patience I didn’t have that day.
These jars were my answer.
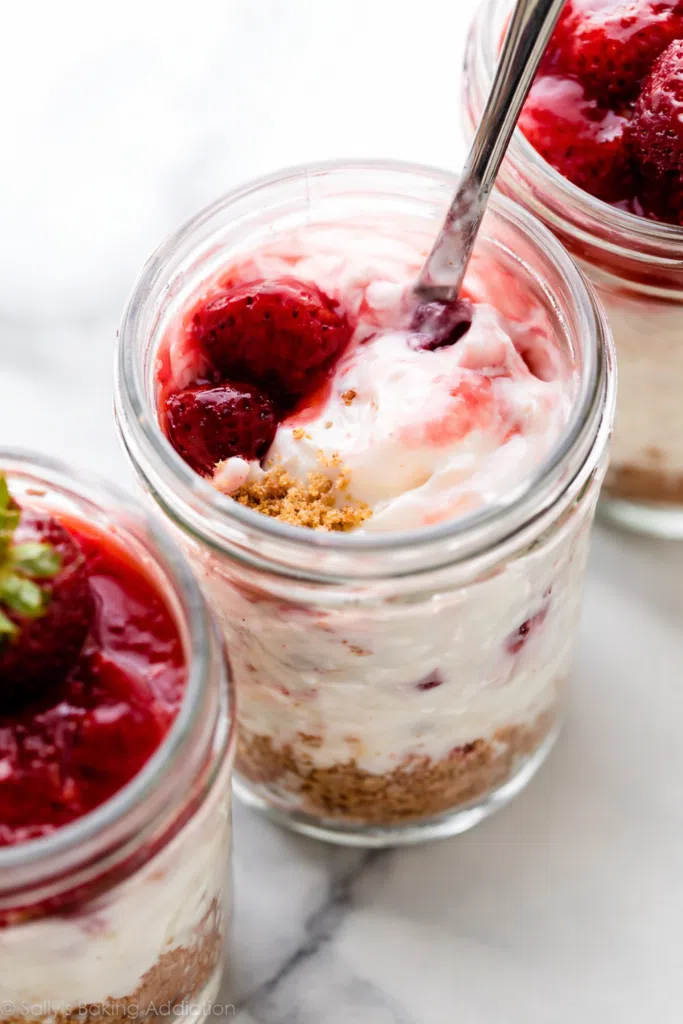
They’re creamy, lightly sweet, and layered in a way that feels special without being complicated. There’s something soothing about spooning cheesecake into little jars, one layer at a time, knowing you can stop whenever you need to. No oven. No stress. Just a dessert that meets you where you are.

Why You’ll Love This Recipe
These no-bake cheesecake jars are the kind of dessert that quietly becomes a staple.
First, they’re incredibly easy. If you can stir, whip, and layer, you can make these. There’s no baking, no water baths, and no worrying about cracks or doneness.
Second, the texture is dreamy. The filling is smooth and creamy, with just enough tang from the cream cheese to balance the sweetness. Paired with a buttery crumb base, every bite feels balanced and satisfying.
Third, they’re perfectly portioned. Individual jars make serving effortless and prevent that “just one more slice” situation — although no judgment if you go back for seconds.
Fourth, they’re adaptable. You can change the toppings, swap flavors, or make them ahead for gatherings, school events, or quiet evenings at home.
And finally, they feel special without being fussy. Emma loves decorating the tops with fruit, Noah prefers extra crumbs, and Mark always comments on how “light” they taste — which is his way of saying he’s going to eat the whole jar.
The Origin of This Recipe
Cheesecake has always felt like a celebration dessert to me. Growing up, it showed up at birthdays, holidays, and special family dinners. But traditional cheesecake also comes with rules — precise temperatures, long bake times, careful cooling.
As a busy mom, I wanted something that captured the comforting flavor of cheesecake without the pressure.
No-bake cheesecakes have been around for generations, especially in home kitchens where ovens were already working overtime. These jars are my everyday adaptation of that idea — scaled down, simplified, and designed to fit real life.
Instead of slicing and serving, everything happens in layers. There’s no perfection required. Each jar tells its own little story, and that feels right to me.
Ingredients
What I love most about this recipe is how familiar the ingredients are. Nothing fancy, nothing hard to find — just a handful of staples working together.
Graham Cracker Crumbs
These form the base of the cheesecake jars. They bring sweetness, texture, and that classic cheesecake flavor. Finely crushed crumbs create a more cohesive base.
Butter
Melted butter binds the crumbs together and adds richness. It should be just melted, not hot, so it coats evenly.
Cream Cheese
This is the heart of the cheesecake. Full-fat cream cheese creates the creamiest texture and best flavor. Let it soften fully before mixing to avoid lumps.
Heavy Cream
Whipped cream lightens the filling and gives it that airy, spoonable texture. Cold cream whips best.
Sugar
Granulated sugar sweetens the filling without overpowering the tang of the cream cheese.
Vanilla Extract
Vanilla adds warmth and depth, rounding out the flavor and making the cheesecake taste complete.
Toppings (Optional but Encouraged)
Fresh berries, fruit compote, chocolate shavings, caramel drizzle — this is where you can have fun.
Instructions
Step 1: Make the Crumb Base
In a bowl, mix the graham cracker crumbs with melted butter until the mixture looks like damp sand. When pressed between your fingers, it should hold together lightly.
Spoon the mixture into the bottom of each jar and gently press it down with the back of a spoon.
Tip: Don’t pack it too tightly — a light press keeps the base tender instead of hard.
Step 2: Whip the Cream
In a cold bowl, whip the heavy cream until stiff peaks form. This means the cream should hold its shape when you lift the whisk.
Set it aside in the refrigerator while you prepare the filling.
Common mistake: Over-whipping can turn cream grainy. Stop as soon as it holds firm peaks.
Step 3: Make the Cheesecake Filling
In a separate bowl, beat the softened cream cheese until smooth and creamy. Take your time here — smoothness matters.
Add the sugar and vanilla, mixing until fully incorporated and fluffy.
Step 4: Fold Everything Together
Gently fold the whipped cream into the cream cheese mixture using a spatula. Use slow, sweeping motions to keep the mixture light and airy.
Visual cue: The filling should look smooth, thick, and cloud-like.
Step 5: Assemble the Jars
Spoon or pipe the cheesecake filling over the crumb base in each jar. Smooth the tops lightly.
Add your chosen toppings — fruit, crumbs, or sauces.
Step 6: Chill
Refrigerate the jars for at least 2 hours. This allows the cheesecake to set and the flavors to meld.
Patience tip: Overnight chilling makes them even better.
Tips & Flavor Variations
- Use Fully Softened Cream Cheese
Cold cream cheese leads to lumps. Let it sit at room temperature for at least an hour. - Chill Before Serving
Chilling firms the texture and improves flavor. Warm cheesecake jars won’t hold their shape. - Citrus Twist
Add lemon or lime zest to the filling for brightness and balance. - Chocolate Version
Mix melted, cooled chocolate into the filling for a richer dessert. - Seasonal Fruit Layers
Add fresh berries in summer or spiced apples in fall for variety. - Cookie Crust Swap
Use crushed cookies instead of graham crackers for a different flavor base.
Common Myths & Mistakes
Myth 1: “No-Bake Cheesecake Is Too Soft”
People believe this because they skip chilling time.
Why it’s incorrect: Proper chilling allows the filling to set beautifully.
Correct approach: Give it time in the fridge.
Myth 2: “Low-Fat Ingredients Work the Same”
Lower-fat dairy lacks the structure and richness needed.
Correct approach: Use full-fat cream cheese and cream for best results.
Myth 3: “You Need Gelatin”
Some think gelatin is required for stability.
Correct approach: Proper ratios and chilling provide all the structure you need.
FAQ
Can I make these ahead of time?
Yes. They’re perfect for making 1–2 days in advance.
How long do they last in the fridge?
Up to 3 days when covered tightly.
Can I freeze cheesecake jars?
Yes. Freeze without toppings and thaw overnight in the fridge.
Why is my filling runny?
Usually from under-whipped cream or warm ingredients.
Can I use store-bought whipped topping?
You can, but fresh whipped cream gives better flavor and texture.


