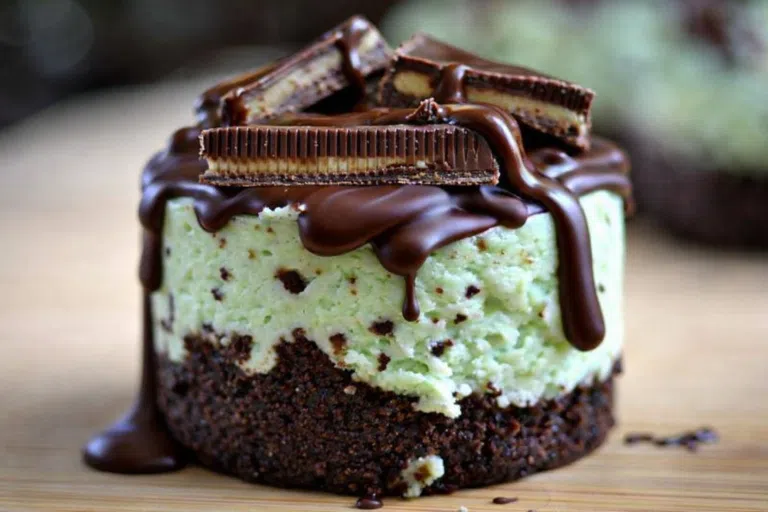
Mini Peanut Butter Cup Cheesecakes
Little bites of creamy chocolate-peanut butter comfort
Hi, I’m Helen Whitaker — welcome to Cookliva.
There’s something about mini desserts that makes a regular evening feel like a celebration. The first time I made these Mini Peanut Butter Cup Cheesecakes, it wasn’t for a party or holiday. It was just a quiet Friday night. James had picked up flowers on the way home, Olivia was practicing a school presentation at the kitchen table, and Mason was trying to convince me dessert should come before dinner.
I had a bag of peanut butter cups in the pantry and cream cheese in the fridge. And instead of making a full cheesecake — which always feels like a commitment — I made them mini.
Small, individual, perfectly portioned little cheesecakes with a surprise peanut butter cup tucked inside.
They disappeared faster than I expected.
And now? They’re our go-to when we want something indulgent, but manageable. A treat without excess. Comfort without complication.
Why You’ll Love This Recipe
These little cheesecakes are everything you want in a dessert:
- Rich and creamy without being overwhelming
- Perfectly portioned — no slicing required
- Easy to make ahead
- Ideal for parties, bake sales, or family dessert night
- A beautiful chocolate-peanut butter balance
The texture is silky, the chocolate is smooth, and that peanut butter center gives you that nostalgic bite we all love.
And because they’re baked in a muffin tin, they’re approachable — no water baths or springform pans required.
The Origin of This Recipe
Peanut butter and chocolate have always been a favorite combination in our house. Growing up, my grandmother kept peanut butter cups in a glass jar on her counter. They were “special occasion candy,” but somehow we always found an occasion.
This recipe blends that childhood memory with a classic baked cheesecake method.
Instead of topping cheesecake with peanut butter cups, we bake one right inside each mini cake. That way, every bite has a creamy cheesecake layer and a soft, slightly melty peanut butter center.
It’s nostalgic — but elevated just enough to feel special.
Ingredients
Here’s what you’ll need for about 12 mini cheesecakes:
Crust
- 1 cup chocolate cookie crumbs
- 2 tablespoons granulated sugar
- 3 tablespoons melted butter
Cheesecake Filling
- 16 ounces cream cheese, softened
- ½ cup granulated sugar
- 2 large eggs
- 1 teaspoon vanilla extract
- ½ cup creamy peanut butter
- 12 mini peanut butter cups (unwrapped)
Optional Topping
- ½ cup semi-sweet chocolate chips
- ¼ cup heavy cream

Instructions (Detailed Step-by-Step Guide)
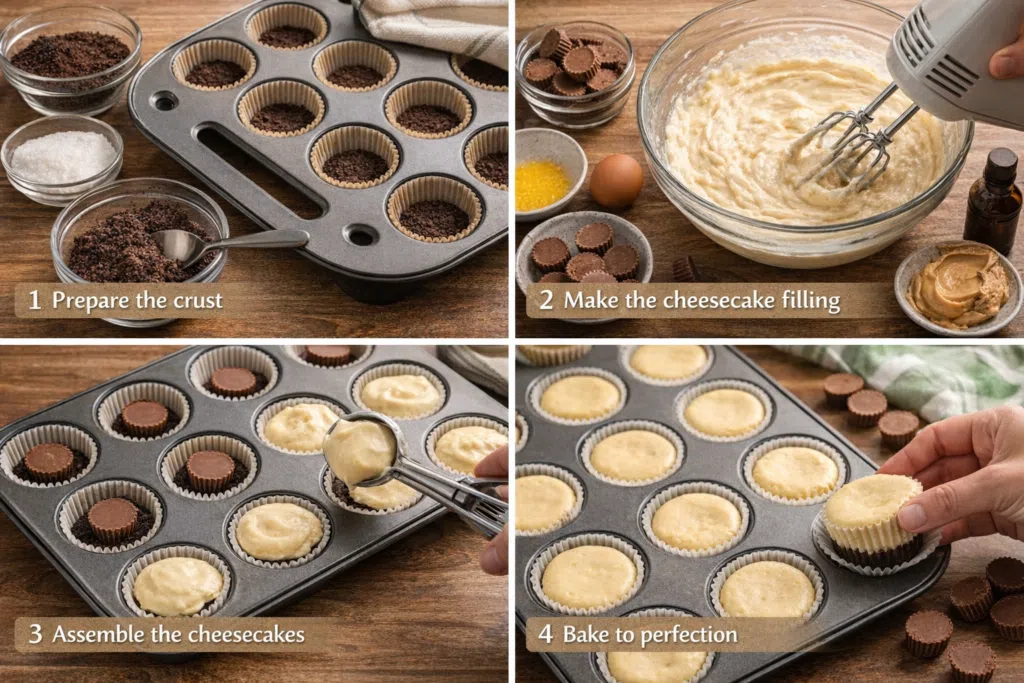
Step 1: Prepare the Chocolate Crust Base
Preheat your oven to 325°F (165°C) and line a standard 12-cup muffin tin with paper liners. Liners make removal easier and help maintain clean edges.
In a medium bowl, combine:
- Chocolate cookie crumbs
- Granulated sugar
- Melted butter
Stir until the mixture resembles damp sand. When you press it between your fingers, it should hold its shape without crumbling apart. If it feels too dry, add ½ teaspoon of melted butter at a time.
Spoon about 1 tablespoon of crust mixture into each liner. Using the back of a spoon or the bottom of a small glass, press firmly and evenly.
Pressing firmly is important — a loose crust will crumble once chilled.
Bake for 5 minutes only. This short bake sets the crust and prevents it from becoming soggy later.
Remove from the oven and let cool while preparing the filling.
Step 2: Make the Smooth Peanut Butter Cheesecake Filling
Place softened cream cheese in a large mixing bowl. It must be fully softened to room temperature — this prevents lumps.
Beat on medium speed for about 1–2 minutes, scraping down the sides of the bowl. The texture should be completely smooth before adding anything else.
Add granulated sugar and mix until creamy and fully incorporated.
Now add the eggs, one at a time, mixing on low speed just until blended. Avoid overmixing — too much air in the batter can cause cracking during baking.
Stir in vanilla extract and creamy peanut butter. Mix until smooth and uniform in color.
The batter should be thick but silky. If it looks grainy, continue mixing gently until smooth.
Step 3: Assemble the Mini Cheesecakes
Place one mini peanut butter cup directly in the center of each pre-baked crust.
Gently spoon cheesecake batter over the peanut butter cup, filling each liner about ¾ full. Leave a small gap at the top — the cheesecakes will rise slightly while baking.
Once filled, gently tap the muffin pan on the counter 2–3 times. This releases air bubbles and ensures an even surface.
At this stage, the tops should look smooth and level.
Step 4: Bake to Perfect Creamy Texture
Place the muffin tin in the center rack of your oven.
Bake for 18–22 minutes.
You’re looking for these visual cues:
- The edges are set and slightly puffed
- The centers still have a gentle jiggle when lightly shaken
- The tops are matte, not shiny
Do NOT wait until they look fully firm. Cheesecake continues cooking from residual heat after removal.
Overbaking leads to dry texture and cracks.
Remove from the oven and let cool completely in the pan at room temperature for about 45 minutes.
Then transfer to the refrigerator and chill for at least 2 hours, preferably 4 hours for best texture.
Chilling is not optional — this is when the structure fully sets.
Step 5: Optional Chocolate Ganache Topping
In a small saucepan or microwave-safe bowl, heat heavy cream until just steaming. Do not boil.
Pour the hot cream over the chocolate chips and let sit untouched for 1–2 minutes.
Stir slowly from the center outward until smooth and glossy.
Spoon about 1 teaspoon over each chilled cheesecake and spread gently with the back of the spoon.
Let the ganache set in the refrigerator for about 20–30 minutes before serving.
For an extra touch, sprinkle a pinch of flaky sea salt on top.
Tips & Flavor Variations
- Use Room Temperature Ingredients
Cold cream cheese creates lumps. Let it soften fully before mixing. - Don’t Overbake
Slight jiggle in the center prevents dry texture. - Try Oreo Crust
Chocolate sandwich cookies make a richer base. - Add Sea Salt on Top
A pinch enhances the chocolate-peanut butter flavor. - Make It Swirled
Instead of placing the peanut butter cup inside, swirl extra peanut butter into the batter for a marbled look. - Freeze for Clean Serving
Chill thoroughly before serving for neat edges.
Common Myths & Mistakes
Myth 1: Cheesecake Must Always Use a Water Bath
Many believe all cheesecakes require a water bath to prevent cracking.
This comes from traditional full-size cheesecakes baked in springform pans, where even baking is critical.
However, mini cheesecakes bake faster and more evenly. Their smaller size reduces the risk of cracking.
The correct approach is controlled mixing and careful baking. Avoid overmixing and overbaking. Minis simply don’t require a water bath.
Myth 2: More Peanut Butter Equals Better Flavor
It’s tempting to add extra peanut butter for intensity.
This belief comes from thinking stronger flavor always improves desserts.
But too much peanut butter alters texture. It can make the cheesecake dense and heavy.
The correct balance keeps it creamy while allowing the peanut butter cup center to shine.
Flavor should complement, not overpower.
Myth 3: Cheesecake Should Be Completely Firm When Removed from Oven
Many wait until cheesecake feels fully firm before removing it.
This usually leads to overbaking.
Cheesecake continues to cook from residual heat. A slight jiggle in the center is ideal.
The correct approach is removing it just before it looks “done.” Trust the cooling process to finish the structure.
FAQ – Frequently Asked Questions
How long do mini cheesecakes last in the refrigerator?
Store them in an airtight container for up to 5 days. The flavor actually improves after 24 hours as everything settles. Keep them chilled and avoid stacking without parchment between layers.
Can I freeze mini peanut butter cheesecakes?
Yes. Freeze without toppings in a single layer until solid, then transfer to a freezer container. They keep well for up to 2 months. Thaw overnight in the refrigerator for best texture.
Why did my cheesecakes crack?
Cracks usually come from overmixing (too much air) or overbaking. Mix gently and stop baking when the center still jiggles slightly.
Can I use natural peanut butter?
Natural peanut butter can separate and affect texture. If using it, stir thoroughly and expect a slightly softer consistency.
How do I prevent the crust from sticking?
Use quality paper liners and ensure enough melted butter binds the crumbs. Let them cool fully before removing.
These Mini Peanut Butter Cup Cheesecakes are proof that desserts don’t have to be complicated to feel special.
They’re rich, nostalgic, and just the right size to share — or keep all to yourself.
Around our table, they disappear quickly.
And honestly? I never mind making them again.
Storage & Make-Ahead Tips
One of the reasons I love these mini cheesecakes so much is how beautifully they hold up after baking. In fact, I often think they taste even better the next day.
Once the cheesecakes have completely cooled and chilled for at least two hours, transfer them to an airtight container. Store them in the refrigerator for up to 5 days. I recommend placing parchment paper between layers if you need to stack them — this keeps the tops smooth and prevents sticking.
If you’ve added chocolate ganache, let it set fully before storing so it doesn’t smudge.
For longer storage, these freeze surprisingly well. Place the cheesecakes (without toppings if possible) on a baking sheet and freeze until solid. Then transfer them to a freezer-safe container. They’ll keep for up to 2 months. When ready to enjoy, thaw overnight in the refrigerator — not at room temperature — to maintain their creamy texture.
One small tip I’ve learned over time: never cover them while they’re still warm. Trapped steam creates condensation, and condensation softens the crust.
Patience makes all the difference.
A Sweet Little Conclusion
These Mini Peanut Butter Cup Cheesecakes are the kind of dessert that reminds me why I love baking in the first place.
They’re simple, approachable, and quietly impressive. No complicated techniques. No fancy equipment. Just thoughtful layering of flavors we already love — chocolate, peanut butter, and cream cheese baked into something comforting and shareable.
Around our table, desserts aren’t about perfection. They’re about slowing down. Sitting together a little longer. Watching Mason sneak an extra one when he thinks I’m not looking. Listening to Olivia describe her day. Watching James reach for a second without hesitation.
That’s what these little cheesecakes really are.
Not just dessert.
But a reason to gather.
And in this kitchen — that’s always enough.
Print
Mini Peanut Butter Cup Cheesecakes
- Total Time: 2 hours 45 minutes
- Diet: Vegetarian
Description
Creamy mini cheesecakes with a hidden peanut butter cup center and chocolate topping.
Ingredients
1 cup chocolate cookie crumbs
2 tablespoons sugar
3 tablespoons melted butter
16 ounces cream cheese
½ cup sugar
2 eggs
1 teaspoon vanilla extract
½ cup peanut butter
12 mini peanut butter cups
½ cup chocolate chips
¼ cup heavy cream
Instructions
-
Preheat oven to 325°F and line muffin tin.
-
Mix crumbs, sugar, butter; press into liners and bake 5 minutes.
-
Beat cream cheese and sugar; add eggs, vanilla, peanut butter.
-
Place peanut butter cup in each liner and fill with batter.
-
Bake 18–22 minutes until centers slightly jiggle.
-
Chill at least 2 hours.
-
Top with optional ganache.
Notes
Store refrigerated up to 5 days.
Freeze up to 2 months.
Do not overbake for best texture.
- Prep Time: 15 minutes
- Cook Time: 20 minutes
- Category: Dessert
- Method: Baking
- Cuisine: American
Nutrition
- Serving Size: 12
- Calories: 290 per serving
- Sugar: 18g
- Fat: 22g