
Mini Crème Brûlée Cheesecakes
Elegant Individual Dessert with Caramelized Sugar Top
Hi, I’m Helen Whitaker — welcome to Cookliva.
Some desserts feel like they belong to quiet evenings, soft music, and the gentle clink of spoons against porcelain. These Mini Crème Brûlée Cheesecakes are exactly that kind of dessert in our home.
The first time I made them, it was a Sunday afternoon. Daniel was reading in the living room, and the kids — Olivia and Mason — were supposed to be “quietly playing,” which, as most parents know, rarely lasts. I wanted something elegant but manageable. Something that felt special without requiring a culinary degree or hours of stress.
When I cracked the caramelized sugar topping with the back of a spoon and handed one to Daniel, his eyes widened. “You made this?” he asked. And the kids? They were fascinated by the crackly sugar top. It felt like magic in our kitchen.
Let me show you how to make that magic happen in yours.
WHY YOU’LL LOVE THESE MINI CRÈME BRÛLÉE CHEESECAKES
There are so many reasons these little beauties have become a regular in my dessert rotation:
• They look impressive but are surprisingly simple to make.
• Individual portions mean no slicing and no messy servings.
• The creamy cheesecake layer pairs perfectly with that crisp caramelized sugar top.
• They can be made ahead — which is a lifesaver when hosting.
• They feel elegant enough for celebrations but easy enough for a family treat.
What I love most is the contrast. The silky, rich cheesecake underneath and that thin, glass-like sugar shell on top. When your spoon breaks through the caramel layer and sinks into the creamy center — that moment is everything.
THE ORIGIN OF THIS RECIPE
Crème brûlée has always been one of my favorite classic desserts. That custard base, gently baked in a water bath, topped with torched sugar — it’s timeless.
Cheesecake, on the other hand, has always been Daniel’s favorite. So one evening, I thought — why not combine the two?
By using a classic graham cracker crust as the base, adding a rich vanilla cheesecake filling, and finishing with a caramelized sugar topping, you get the best of both worlds.
It’s not traditional French crème brûlée. It’s not traditional New York cheesecake either. It’s something cozy, comforting, and just a little bit fancy — which is exactly how I like my desserts.
INGREDIENTS
Here’s everything you’ll need:
For the crust:
• 1 cup graham cracker crumbs
• 2 tablespoons sugar
• 4 tablespoons melted butter
For the cheesecake filling:
• 16 ounces cream cheese, softened
• ½ cup granulated sugar
• 2 large eggs
• 1 teaspoon pure vanilla extract
• ¼ cup heavy cream
For the topping:
• 4–5 tablespoons granulated sugar (for caramelizing)
Ingredient Notes
Cream cheese is the heart of this dessert. Make sure it’s fully softened — cold cream cheese leads to lumps, and we want silky smooth texture.
Heavy cream adds richness and softens the density of the cheesecake, giving it that custard-like feel reminiscent of crème brûlée.
Vanilla is essential. Use pure vanilla extract if possible. It gives depth and warmth that artificial versions simply can’t replicate.

INSTRUCTIONS
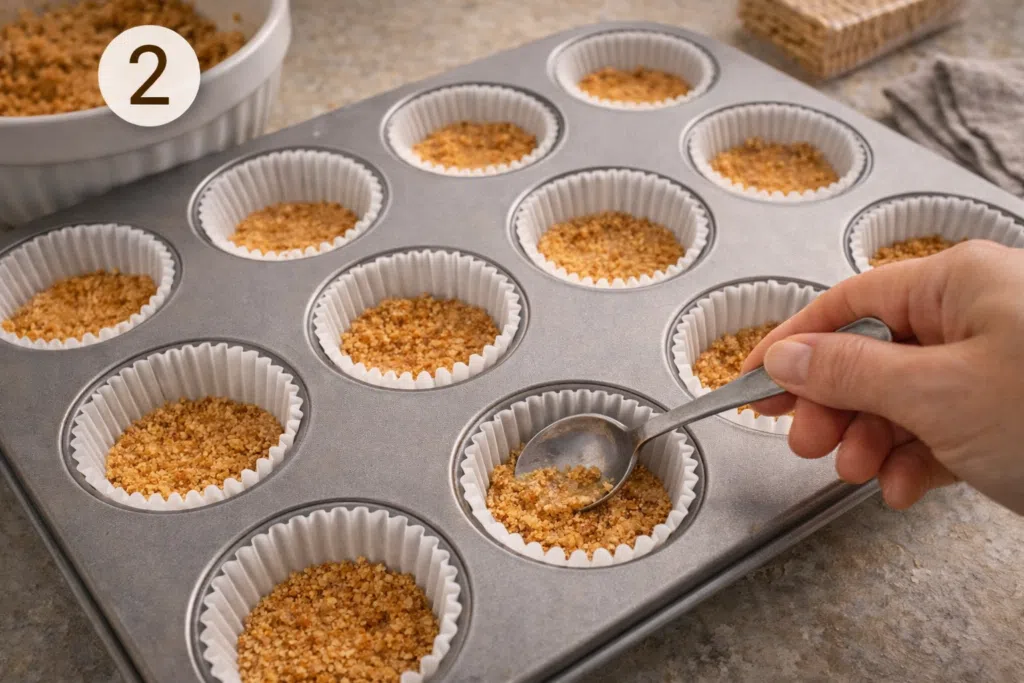
- Preheat your oven to 325°F (160°C). Line a muffin tin with paper liners. This helps with easy removal later.
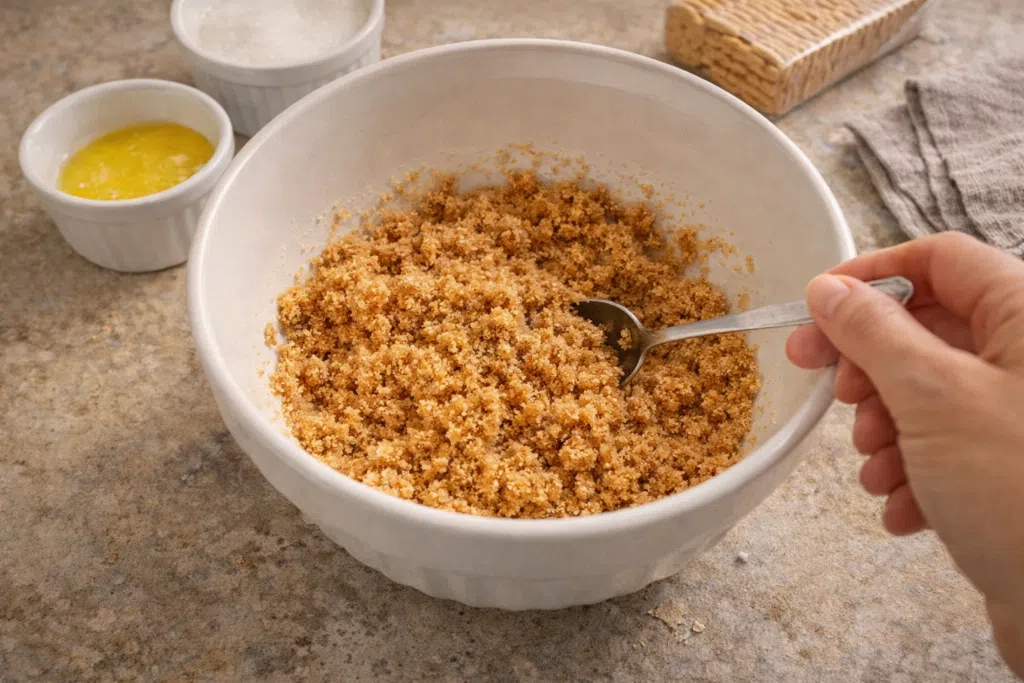
- In a bowl, combine graham cracker crumbs, sugar, and melted butter. Stir until the texture resembles wet sand. If it feels too dry, add a teaspoon more melted butter.
- Press about one tablespoon of the mixture firmly into each liner. Use the back of a spoon to compact it. The crust should be tight and even — this prevents crumbling later.
- Bake the crusts for 5 minutes, then set aside to cool slightly.
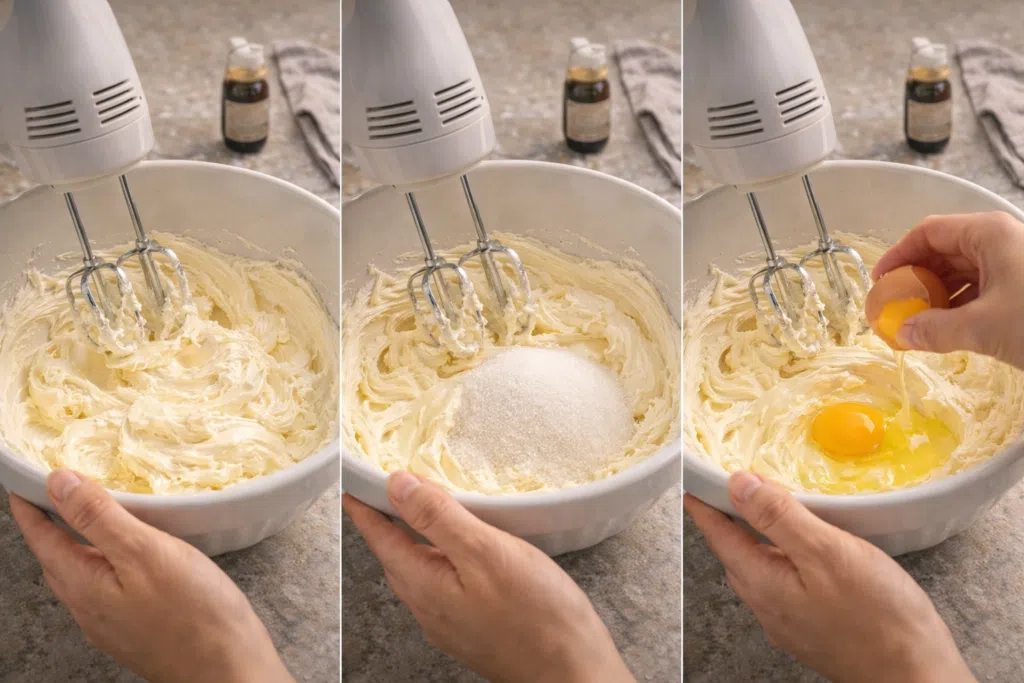
- In a large bowl, beat softened cream cheese until completely smooth. Take your time here — at least 2–3 minutes. Scrape the bowl often.
- Add sugar and mix gently. Avoid whipping too much air into the batter — too much air can cause cracks.
- Add eggs one at a time, mixing just until incorporated. Overmixing after eggs can lead to dense texture.
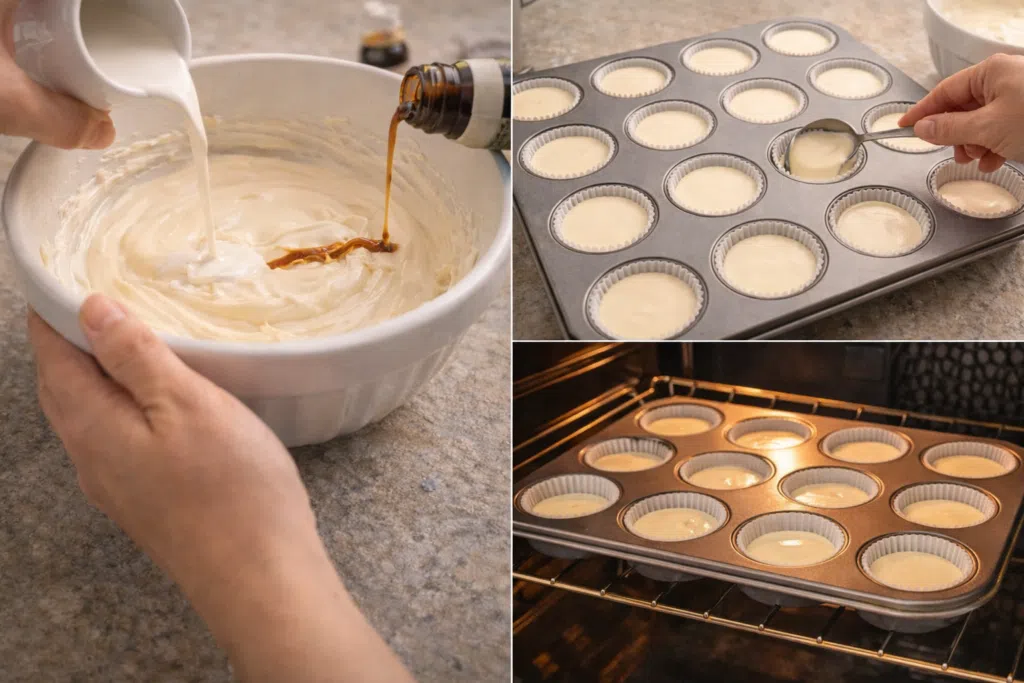
- Stir in vanilla and heavy cream. The batter should look smooth and glossy.
- Divide evenly among crusts, filling about ¾ full.
- Bake for 18–22 minutes. The centers should jiggle slightly when gently shaken. They will firm up as they cool.
- Let them cool completely at room temperature, then refrigerate for at least 4 hours.
- Before serving, sprinkle about 1 teaspoon of sugar evenly on top of each cheesecake.
- Using a kitchen torch, caramelize the sugar until golden brown. Keep the flame moving to avoid burning.
Let the topping harden for 1–2 minutes before serving. That crack is worth the wait.
TIPS & FLAVOR VARIATIONS
- Room temperature ingredients matter. Cold cream cheese creates lumps that never fully disappear.
- Don’t overbake. Slight jiggle equals creamy texture later. Overbaked cheesecakes turn dry.
- Torch carefully. Keep the torch 2–3 inches away and move constantly. Staying in one spot causes bitter burnt sugar.
- Add citrus zest. A little lemon zest in the filling brightens the flavor beautifully.
- Chocolate version. Add 2 tablespoons melted dark chocolate to the batter for a richer twist.
Seasonal variations:
• Add pumpkin spice in fall.
• Top with fresh berries in summer.
• Add espresso powder for a coffee-inspired version.
COMMON MYTHS & MISTAKES
Myth 1: Cheesecake must bake until completely firm in the center.
Many believe that if the center jiggles at all, it’s undercooked. This idea likely comes from baking cakes, where wet batter in the middle signals raw texture. However, cheesecake is entirely different. It continues cooking from residual heat after removal from the oven. If you bake it until fully firm in the oven, you’re actually overbaking it. The proteins tighten excessively, leading to dry, crumbly texture. The correct approach is to remove the cheesecakes when the center still has a gentle wobble — similar to gelatin. They will firm up beautifully as they cool.
Myth 2: Cracks mean failure.
Social media perfection has convinced many that cracks equal disaster. In reality, cracks are cosmetic. They usually result from overmixing, overbaking, or sudden temperature shifts. They don’t ruin flavor or texture. The correct approach is to mix gently after adding eggs and avoid rapid cooling. And remember — in this recipe, the caramelized sugar topping hides any minor imperfections anyway.
Myth 3: You can caramelize sugar without fully chilling the cheesecake.
Some think they can rush the chilling process and torch immediately. This leads to melted, soupy tops because the cheesecake beneath is still soft. Proper chilling allows the structure to set, so the heat from the torch only affects the sugar layer. Always chill at least 4 hours for best results.
FAQ – FREQUENTLY ASKED QUESTIONS
Can I make mini crème brûlée cheesecakes without a kitchen torch?
Yes, you can use your oven broiler. Place cheesecakes on the top rack and watch constantly. However, broilers heat unevenly and can warm the cheesecake too much. If possible, I recommend investing in a small torch for better control and texture consistency.
How long do mini cheesecakes last in the refrigerator?
They keep well for up to 4 days in an airtight container. Add the caramelized sugar topping just before serving to maintain that crisp crack.
Can I freeze mini cheesecake before adding the brûlée topping?
Absolutely. Freeze without the sugar topping. Wrap tightly and store up to 2 months. Thaw overnight in the refrigerator before caramelizing sugar.
Why did my cheesecake sink in the center?
This usually happens from overmixing or sudden cooling. Avoid whipping excess air into the batter and let them cool gradually at room temperature before refrigerating.
Can I substitute mascarpone for cream cheese?
You can, but the texture will be softer and slightly less tangy. It creates a more custard-like dessert. If using mascarpone, reduce heavy cream slightly to maintain structure.
STORAGE & MAKE-AHEAD TIPS
These mini cheesecakes are wonderful for planning ahead, which is one reason I love making them when we host friends.
Store them in an airtight container in the refrigerator for up to four days. For best texture, wait to caramelize the sugar until just before serving. The sugar topping can soften if refrigerated after torching.
If freezing, wrap each cooled cheesecake individually in plastic wrap, then place in a freezer-safe container. Freeze up to two months. Thaw overnight in the refrigerator.
To preserve texture, avoid microwaving to thaw. Slow thawing keeps the filling creamy and smooth.
If making ahead for a party, prepare and refrigerate one day before. Torch the sugar topping just before guests arrive. It only takes minutes and feels wonderfully dramatic.
CONCLUSION
Cooking doesn’t have to be complicated to feel special. These Mini Crème Brûlée Cheesecakes are proof of that.
They bring elegance without stress, indulgence without intimidation. And when I see Olivia carefully tapping the sugar top to hear it crack, or Mason asking for “just one more,” I’m reminded why I love creating desserts like this.
It’s not about perfection. It’s about connection.
And if you make these in your kitchen, I hope they bring that same little spark of joy to your table.
Print
Mini Crème Brûlée Cheesecakes
- Total Time: 4 hours 45 minutes
- Diet: Vegetarian
Description
Creamy mini cheesecakes with a crisp caramelized sugar topping that combines classic crème brûlée elegance with rich cheesecake flavor.
Ingredients
1 cup graham cracker crumbs
2 tablespoons sugar
4 tablespoons melted butter
16 ounces cream cheese, softened
½ cup granulated sugar
2 large eggs
1 teaspoon vanilla extract
¼ cup heavy cream
4–5 tablespoons sugar for topping
Instructions
-
Preheat oven to 325°F and line muffin tin.
-
Mix graham crumbs, sugar, and butter. Press into liners.
-
Bake crust 5 minutes and cool.
-
Beat cream cheese until smooth.
-
Add sugar, then eggs one at a time.
-
Mix in vanilla and heavy cream.
-
Fill liners ¾ full.
-
Bake 18–22 minutes until slightly jiggly in center.
-
Cool completely and refrigerate 4 hours.
-
Sprinkle sugar and torch until caramelized before serving.
Notes
Chill fully before torching.
Store in refrigerator up to 4 days.
Freeze without topping up to 2 months.
Add sugar topping just before serving for best texture.
- Prep Time: 20 minutes
- Cook Time: 22 minutes
- Category: Dessert
- Method: Baking
- Cuisine: American-French Fusion
Nutrition
- Serving Size: 12
- Calories: 290 per serving
- Sugar: 18g
- Fat: 21g


